

Email Analysis Using Python 3 (Part I) by Ogheneyoma Okobiah
- Jun 4, 2020
- 5 min read
Original Author: Ogheneyoma Okobiah.
Source: yomaokobiah.com
There is a lot of data out there, mostly unstructured. Emails are a great source of communication data as such there is no limit to what we can harness from it. At the end of this tutorial you would be able to get email data for insights.
Prerequisites
Familiarity with Python 3
Pandas
Matplotlib
Seaborn
Wordcloud
A gmail account
Getting The Data
There are several ways to achieve the aim of this article. Find below, how I did mine.
Here a Gmail account is being used; for the imaplib script to work the following changes have to be made to the Gmail account; enabling IMAP and turning on less secured apps.
To enable IMAP, first open Gmail, then click on the settings icon and click settings. Click on the Forwarding and POP/IMAP tab. In the "IMAP Access" section, select Enable IMAP. Then click save changes. If you need more help visit this Gmail help page.
To turn on less secured apps, navigate to your Google dashboard either by clicking on your account avatar in the upper right-hand corner of your screen and then clicking My Account or by navigating to myaccount.google.com. Then choose Sign-in & security, scroll down until you see the option Allow less secure apps, and turn the access on.
Step 1: Importing the required libraries to get the email data.
imaplib is an Internet Message Access Protocol (IMAP) library
email is a python library that parses, handles and generates email messages.
getpass is a python library that contains utilities to get password or current username
pandas is a python library for data manipulation and analysis.
import imaplib
import email
import getpass
import pandas as pd
Step 2: Gaining access to the email address.
username is the email address.
password is the password to the email address when prompted. [If you don't want to use the getpass package, you can enter your password as a string.]
mail is the email server we're going to connect to and it varies, for this tutorial we're using gmail.
mail.login is an attempt to log into the servernusing the provided credentials.
username =  input("Enter the email address: ")
password = getpass.getpass("Enter password: ")
mail = imaplib.IMAP4_SSL('imap.gmail.com')
mail.login(username, password)
Step 3: Specifying the mailbox to get data from.
mail.list() is a method that gives a list of the mailboxes - i.e inbox, draft and so on in the email address.
mail.select() is a method that takes an argument of the mailbox you want to get data from"""
print(mail.list())
mail.select("inbox")
Step 4: Searching and Fetching the data.
Line 1: mail.uid() is a method whose first argument is the command you want to execute, in this case the command is "search". The rest of the arguments are used for the search. (Search gives from oldest to recent)
Line 1: result is an exit code of the command while numbers is a list that contains an object of type byte.
Line 2: is a list of every section in numbers.
Line 3: is a list of decoded bytes
Line 4: is a slice of the recent 100 items [recall that search orders it from oldest to recent].
Line 5: the command we want to execute is "fetch" and store it in messages. We're fetching the subject of the messages based on the uids.
result, numbers = mail.uid('search', None, "ALL")
uids = numbers[0].split()
uids = [id.decode("utf-8") for id in uids ]
uids = uids[-1:-101:-1]
result, messages = mail.uid('fetch', ','.join(uids), '(BODY[HEADER.FIELDS (SUBJECT FROM DATE)])')
Step 5: Preparing the data to be exported.
Line 1-3: empty lists for the data we specified in messages.
Line 4: looping through the content of the message we fetched. Using a step of two because it returned a tuple of two items.
Line 5: parsing the bytes email to message object.
Line 6-11: msg is in bytes, in order to use it it had to be decoded to a format we can read.
Line 12: adding the dates to date_list.
Line 13-15: getting the sender detail, it's in the format "Sender name" <sender email address> hence the split and replace methods are used to get only the "Sender name".
Line 16-19: converting the objects in date_list to datetime objects, because the time has it's UTC format attached, a new list was created and the UTC format was sliced off from each object in the list.
Line 20-22: checking the length of created lists, because arrays have to be the same length.
Line 23-25: converting the lists to a dictionary and then a pandas dataframe, viewing it and saving it for download.
date_list = []
from_list = []
subject_text = []
for i, message in messages[::2]:
    msg = email.message_from_bytes(message)
    decode = email.header.decode_header(msg['Subject'])[0]
    if isinstance(decode[0],bytes):
        decoded = decode[0].decode()
        subject_text.append(decoded)
    else:
        subject_text.append(decode[0])
    date_list.append(msg.get('date'))
    fromlist = msg.get('From')
    fromlist = fromlist.split("<")[0].replace('"', '')
    from_list1.append(fromlist)
date_list = pd.to_datetime(date_list)
date_list1 = []
for item in date_list:
    date_list1.append(item.isoformat(' ')[:-6])
print(len(subject_text))
print(len(from_list))
print(len(date_list1))
df = pd.DataFrame(data={'Date':date_list1, 'Sender':from_list, 'Subject':subject_text})
print(df.head())
df.to_csv('inbox_email.csv',index=False)
Visualisation
Now that we have a the email data in CSV format, we can read the data using pandas, and visualise it. There are several Python data visualisation libraries, but here I used Wordcloud, Matplotlib and Seaborn. I wanted to see an image of the most used words in the subjects of my emails; here is how I did it.
Step 1: Reading and viewing the csv.

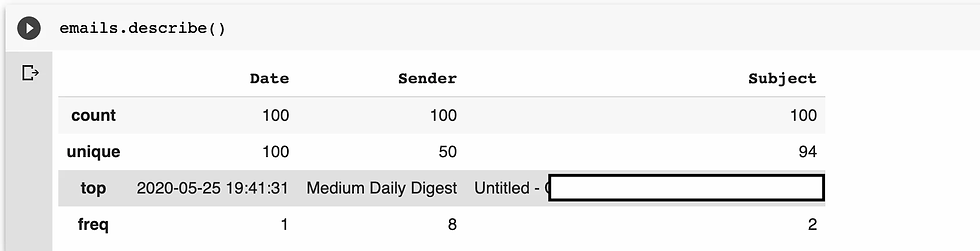
Step 2: Getting statistical data.
I used the the describe method to get the statistical data, unique values and all to get insight on what's in the data.
Step 3: Creating new variables.
I created two variables; Time and SinceMid. SinceMid is the number of hours after midnight.
(Note: The time can be removed from the date column completely)
from datetime import datetime
FMT = '%H:%M:%S'
emails['Time'] = emails['Date'].apply(lambda x: datetime.strptime(x, '%Y-%m-%-d%H:%M:%S').strftime(FMT))
emails['SinceMid'] = emails['Time'].apply(lambda x: (datetime.strptime(x, FMT) - datetime.strptime("00:00:00", FMT)).seconds) / 60 / 60
Step 4: The plots.
I created a wordcloud image of the most used words in the subjects of my mails. In this example there are no stopwords, stopwords are usually filtered out as most times they're not informative.
from wordcloud import WordCloud
import matplotlib.pyplot as plt


# Create a list of words
text = ""
for item in emails["Subject"]:
    if isinstance(item,str):
        text += " " + item
    text.replace("'", "")
    text.replace(",","")
    text.replace('"','')


# Create the wordcloud object
wordcloud = WordCloud(width=800, height=800, background_color="white")

# Display the generated image:
wordcloud.generate(text)
plt.figure(figsize=(8,8))
plt.imshow(wordcloud, interpolation="bilinear")
plt.axis("off")
plt.margins(x=0, y=0)
plt.title("Most Used Subject Words", fontsize=20,ha="center", pad=20)
plt.show()
Here's the output:

I created a histogram of the hours after midnight using seaborn.
import seaborn as sns
sns.distplot(emails["SinceMid"],bins=20)
plt.title("Hours since midnight")
Here is the histogram:

You can check out python gallery for more possible visualisations.
Conclusion
I had fun writing this, I hope you did too while reading it. This goes without saying, I encountered ERRORS while doing this [some of them I had never seen before]. When you get error messages, a good starting point is using the print statement to get insight and then googling the error message. The Part II will also be published on this blog, it would focus on getting the body of the mail and not the subject as this one.
The full code can be found here.
Thank you for reading up to this point.
Disclaimer: I encourage you to experiment outside what's written here, if you encounter bugs you're on your own. But if you feel like getting me involved with your bugs [after Googling], send me a DM on Twitter @yomdroid [we'll pray about it and see what we can do]. Thank you in anticipation.


This tutorial on email analysis using Python 3 is super practical. I especially liked the step-by-step guide on enabling IMAP access, which makes extracting data via imaplib much less painful than I feared. youtube playlist duration
The content is helpful for anyone looking to understand email data in a structured way. online mic test
I love how detailed this tutorial is! If you're looking for a simple tool to create a full purple screen for your screen tests, WhiteScreen VIP is worth checking out. It's a great addition to your toolkit for visualizing data and checking screen quality.
Imagine you’re looking for a reliable white bright screen and stumble upon a flashy ad claiming to be the best but with no clear background or credibility. Would you trust it immediately?https://whitescreenvip394.hashnode.dev/how-to-avoid-common-online-white-screen-tool-scams-when-using-digital-platforms
Chudovo is a leading provider of dedicated development teams and a reliable partner to scale the development capabilities of businesses. Our teams help organizations in the usage of advanced technologies and the implementation of scalable software solutions.